
My next thoughts for my project are that I want to build a button on the right grip holder, so I can press it and the camera will automatically start recording. Currently online checking to see if there are DSLR camera buttons that are capable of doing this with the camera I have. Added straps to the stabilizers for more stabilization when walking, which I do a lot of when I am filming.

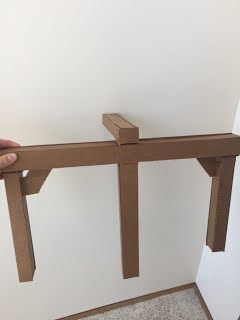
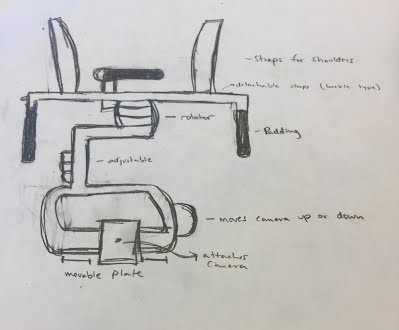
After drawing my camera stabilizer out, I decided to go the cardboard prototype route to make sure that all of the dimensions, cuts, and measurements would work. I am currently very satisfied with how it turned out with just hot glue, a box cutter, and a ruler. For now, I have decided to go to Prototype #2 to make it out of PVC pipe. After that is created, I will design the bottom for where the camera will be held.
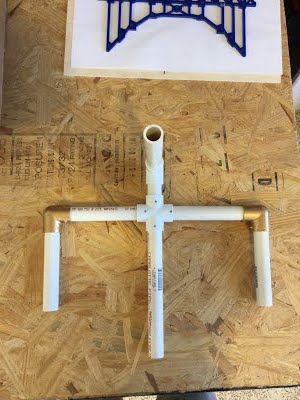
This is the most satisfying part of my design so far. The measurements are perfect (even though I had to use those ugly gold connectors) and the putting together of the pieces were really easy. Being able to watch the process from cardboard to PVC has been great and I have learned from doing it. Now it is time to sketch up some ideas for the compartment that is going to hold the camera. Need to consider the weighting of it, the design so the camera is straight, and make sure the stabilization part is actually stabilized.
THE HALFWAY POINT
My halfway point is the picture that is embedded above. I’ve leaned to make exact measurements with rulers, exact cuts with the roller cutter, how to research exactly what I am looking for, I have designed my prototype with a little bit of design software, and a lot more. I struggled in the beginning to figure out what type of material I was going to use to create my stabilizer, and after my cardboard prototype I was considering thousands of different materials, but stumbled across PCP pipe, which ultimately made the most sense. My classmate gave me great feedback when we went over each others projects in the beginning of class and that allowed me to make ramifications, such as making shoulder straps for stability, 3D printing locks for the joints of the stabilizer, and a way to make it smaller than it was normally. It was easy to cut, measure, and is sturdy enough to hold a camera. I have luckily not hit any true roadblocks, but could be coming up on for how how I’m going to build something to hold the camera. I need to immediately start looking in to what exactly is going to hold my camera so that it is stable and what type of weights I will use for the balance. Some things I need to start thinking about are: what is going to make this product look nice, what type of paint should I use when it is done, and do all of the measurements make sense. An area that I may not be able to get to is developing a bluetooth start and stop button for my camera, so I do not have to refer to the module every time I want to start recording. So far, I’m satisfied with my progress and am excited to see what direction I am headed in.
- Measurements to be exact
- How to cut precisely, not to fast but not too slow
- How to draw lots and lots of prototypes before building one
- I have learned to use designing programs to help me get a grasp on certain things in my project
- How to research the exact thing I am looking for
- How to compare my design to other designs like it
- Time is definitely needed and you must work efficiently
- I’ve also learned to become more confident with the quality of my work
- How to give and receive helpful feedback
Creating the bottom:
I decided to take the route of creating a square at the bottom of the stabilizer about the size of my camera so it would fit snuggly. My first model out of PVC pipe was perfect surprisingly and I decided to stick with it… All of the measurements added up and it looked nice.
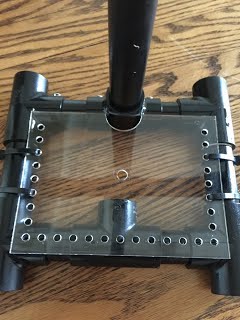
The Holding Plate:
I then began to play around with designing the holding plate that the camera would stick to in Inkscape. I decided to make it the exact size of the square bottom so it would fit right over top, put holes around the square for different attachments, and one hole in the middle for the universal screw. I had to print it two times to get it exactly how I wanted it out of cardboard and then printed it out of plastic. I am going to attach the plastic holding plate with zip ties so that it is easy to take off and put on the stabilizer. This idea also worked just to what I was hoping.
Minor Touches:
After I was set in stone with the final product, I decided to put screws in the PVC pipe exactly where I measure even points so that it would stay straight and I wouldn’t risk it moving during video shots.I also put a washer with the screw that attaches the camera so it would not crack and so it would be more tight to the stabilizer.
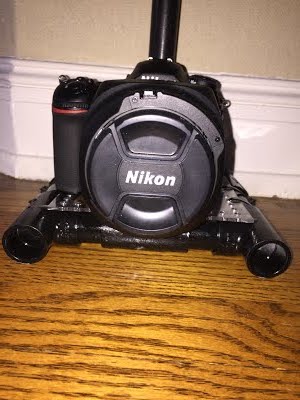
The Final Product:
Once I was finally finished with the overall model, I wanted to spray paint it black so it did not look “cheap”. I spray painted on three coats of black spray paint and it looks very nice. The camera attaches perfectly and the balance in the videos I shoot with it are now steady and look very nice. I will attach a picture of the final product and a video below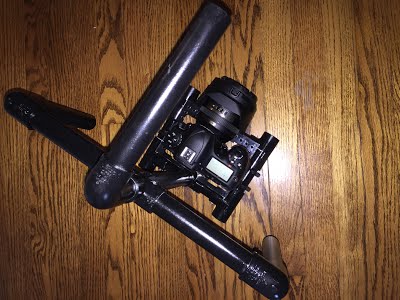
6 Replies to “Camera Stabilizer | 2017”
Comments are closed.