Project Overview:
Initially, I was intrigued by a phone sleeve that someone designed and laser cut out of leather and wood. I thought it would definitely be an interesting and fun project to pursue, so I decided to try to create my own while making adjustments to adapt to my individual situation.
First, I figured that I would have to adjust the dimensions of the case since the original creator's phone is different than mine, so I measured the length, height, and width of my phone. I then added some "excess" length onto some of the measurements since the phone would have to be able to get in and out, not be a perfect fit. Lastly, I made an Adobe Illustrator file using the measurements I recorded and tried out several different designs before finding one that I liked.
After finishing up the file, I successfully made a prototype out of cardstock and cardboard, stitched together with white thread.
Following my prototype, I purchased faux leather to make a final project out of. After lots of trial and error learning, I finished the phone sleeve without including the wooden frame piece, as I deemed it unnecessary.
In the future I think I would want to make sure the pattern looks exactly how I want it with shading before I go on to include the pieces in my final project. Also, as Mr. D suggested, I am going to try to make a phone sleeve out of real leather and improve the production quality. Overall, I learned a ton from this experience and am now a lot more comfortable in the Fab Lab.
Day 7:
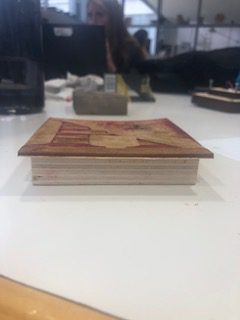
Following my last post, I decided to be more creative with the design on my phone case, rather than use "OFF-WHITE"'s print as reference. Thus, I came up with my own pattern that consists of trapezoids that are offset by one another, and then reflected (as pictured below). After I was content with my design, the next step was getting the "leather" material for the sleeve.
I went to Jo-Ann Fabrics and bought a large sheet of cognac-like colored faux leather that I decided would be the best substitute for real leather in this project. After getting the material, Mr. D recommended that I play around (within reason) with the laser cutter settings to find the optimal ones for laser cutting faux leather since it is not used frequently. At this point, I encountered a few of errors and challenges.
1. One was that the leather (as we will call it) was getting etched unevenly, and other parts looked more burnt than others. This was simply because the leather folded and wrinkled very easily, causing it to "stand up" in different places, thus creating an uneven surface. I was easily able to overcome this by pulling the leather taught and stapling it to a piece of scrap wood to hold it in place.
2. Another challenge I faced was trying to get the same shades to print out twice. Since I played around with different power levels on the laser cutter, I often did not cut out two pieces (as I would need to for the final project) at a time. This resulted in a little bit of frustration when, for whatever reason, I could not seem to imitate the same contrast and color of one of the pieces I had printed out when trying different settings.
3. One last problem I ran into was that the shade of the leather changed in a very irregular and unpredicted way. As the laser got more powerful, it would turn from its natural red-brown color, to a dark brown, then to a camel-color, then to a light beige as it reached the back stitching, making it hard to predict the power level I would need to use in order to produce the color I was seeking. I simply dealt with this problem by writing down some power levels that produced the colors I might want so that I could reference and predict the connection between the power and shade.
At one point, Mr. D recommended that I make one of the phone sleeves without the wooden frame piece and just connect the two pieces of leather to test out how that structure would compare to the original one. Furthermore, Mr. D and I discussed different kinds of stitching, and which would be best for both aesthetic and durability. We reviewed a lot of weaves, and eventually decided on a looping stitch.
So, after I had cut out two sets of leather pieces that I was content with, I made the phone sleeve with no wooden frame by stitching the two pieces together. Contrary to what I was expecting, the sleeve was almost too roomy, and there was more than enough space for the phone to enter and exit the sleeve. I deduced that if I put the sleeve together with the wooden pieces the phone would slip out much too easily with the current dimensions. Thus, I only made the one sleeve, as shown below.
Day 6:
I am combining my work from last class with this one because I was working on primarily the same thing. First, I sewed the prototype together using a basic weave. I skipped every other hole just so that I could see how it would be all together without spending too much time on it. When I sew the final project together I will use a continuous looping weave to sew the pieces together. Below are some pictures of the prototype.
I also had another learning experience today! I started cutting out the wooden part of my final project, but realized that the laser was not cutting all the way through the wood. I ended up going twice over the wood with the laser cutter, which obviously made parts of it burnt and a little less accurate. After talking with Mr. D, I learned that this was simply due to the focus of the laser, and that I needed to manually adjust the height of the wood so that the laser cut could do its work properly. Overall, I look to complete my final project within about a week or so.
Day 5:
The first picture shown below is of the first piece I laser cut today. This was meant to be a cardstock prototype of the back piece of the case. Obviously, there were some problems. I created a design over the case (which can be seen more easily in the later pictures) which accidentally contained .001 font. The laser cutter recognized this and pretty much shredded my project. I was able to fix this by simply going back into my Adobe Illustrator files and deleting the outline of my design.
After fixing the problem, I laser cut a cardstock prototype of the front piece of my case, the back piece, and the frame (out of cardboard). These prototypes are shown below. Another problem that I have run into is that my phone is a bit tall for the case, so it will not fit well. Next class, I will check the height of the cardboard I used and compare it with the wood so that I do not run into this problem when cutting out my final project. Furthermore, I am going to consider making the cardstock pieces a little bit bigger so that the phone fits a little bit more loosely in the case.
Day 4:
I am combining my work from October 15th with my work on October 17th into "Day 4" since I worked on and refined the same thing for the most part. I have succeeded in creating three separate Adobe Illustrator files: one for the wooden-frame piece, one for the front leather cover, and one for the back leather cover. I am not going to post pictures of them on here since they are very hard to see due to the line font being .001. These are just a rough drafts, so I will make adjustments after creating my first prototype. Next class I should be able to laser cut a draft of my project and test the dimensions and sizing. Following, I will post an update about the progress I make and the areas in which I need to improve.
Day 3:
I am not supposed to be doing much work on my computer today, so I am just going to give an overview of some of the details concerning my project.
The original product was made for a different type of phone, so I had to measure the dimensions of my phone and then consider the dimensions of the wooden and leather pieces I would be using. One difficulty I have had with this part of the project is trying to predict how much space I should leave as "excess" so that the phone can easily slide in and out without the case being oversized.
The materials I am going to need for my final project are wood for the case's "skeleton" that will hold the leather pieces in place. Evidently, I will need two pieces of leather or faux-leather (whichever is available) for my project to put on either side of the wooden piece to keep the phone enclosed.
I will keep my page updated with anything that I change or progress that I make.
Day 2:
Unfortunately, today's class was cut short by 20 minutes so I was not able to accomplish as much as I would have liked. However, I was still able to draw a rough draft of the leather part of my phone sleeve and work out the measurements. Just below the diagram are some notes about the project. The next step for me is to start creating a file on Adobe Illustrator that I will be able to use to laser cut a prototype of my project in the future.
Day 1:
Today, I measured the dimensions of my phone so that the phone sleeve/ case would fit accordingly. Furthermore, I looked into the specific design of the base project and started to sketch out one of the pieces I would be laser cutting for the project. The notes in the image below will help guide you through my thought process as I am going along.
Here is the link to the project I am using for reference:
Here is a picture of the finished product that I am basing my work on: