
Mr. D asked for me to make my second box fully functional, and so I have been backing up my SD cards and retropie folder. This involves me using multiple flashdrives and I asked if I could borrow a flashdrive to take home to move more games back over.
Today I informed Mr. D that there was no way I would be able to use the LCD screen to finish the project, and as a result I am not sure how my final project will be graded. It takes about 3 full days of work (while during finals week) to move all the video games and I do not have that amount of time unfortunately. I do not know what will happen now but I have been mainly wandering around the FabLab helping others with their projects.
Mr. D suggested that I could use TFT touch screen 3.5 inch LCD screen inside my box, and I have been researching this option to see if it could work. So far all I’ve found was that I would need to reinstall my project completely and redo all my video games. As I put over 40 video games with BIOS along with the ROMs, I would really want to avoid this if possible.
Websites:
https://learn.adafruit.com/running-opengl-based-games-and-emulators-on-adafruit-pitft-displays/retropie-setup
https://www.raspberrypi.org/forums/viewtopic.php?f=91&t=95366
A guide to setting up Retropie to work with the Pitft screen.
byu/Kriegan inRetroPie
https://raspberrypi.stackexchange.com/questions/49996/running-retropie-on-lcd
After I turned in the design to Mr. D to let him see, it was confirmed that I would need to shrink down the project more. So I spent the whole class trying to shrink the design down further or thinking of ways to make it work like a puzzle to see if they could fit together.
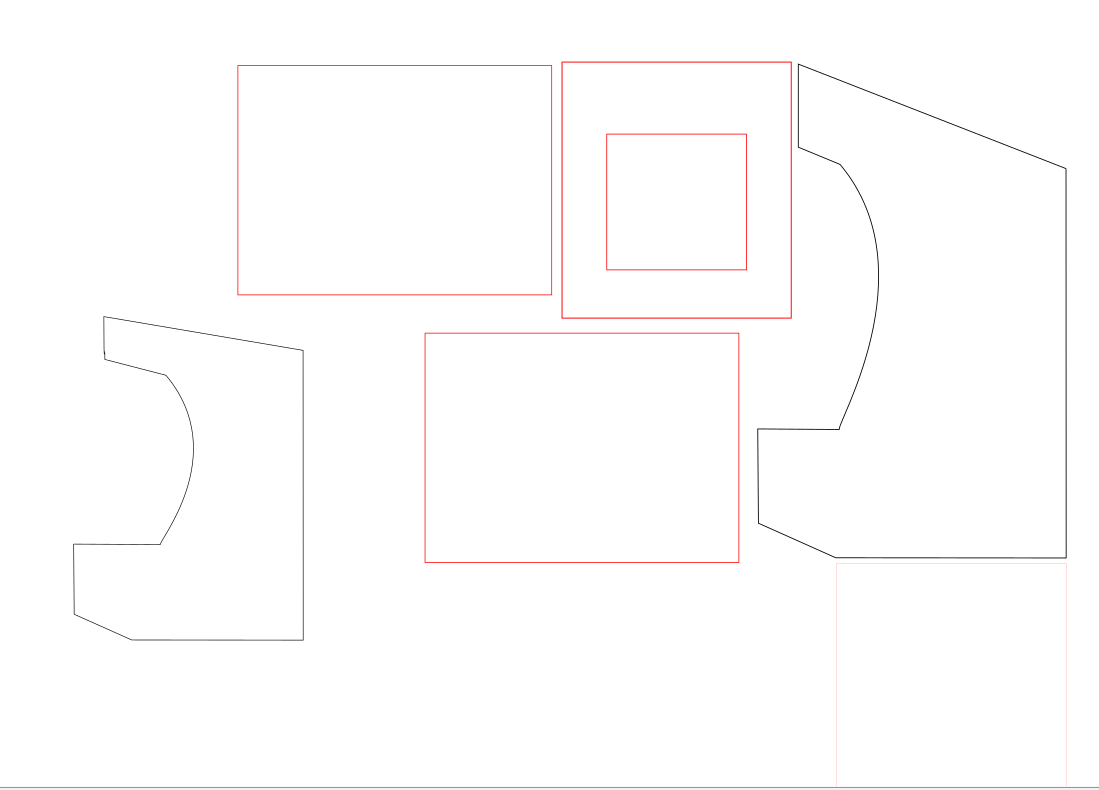
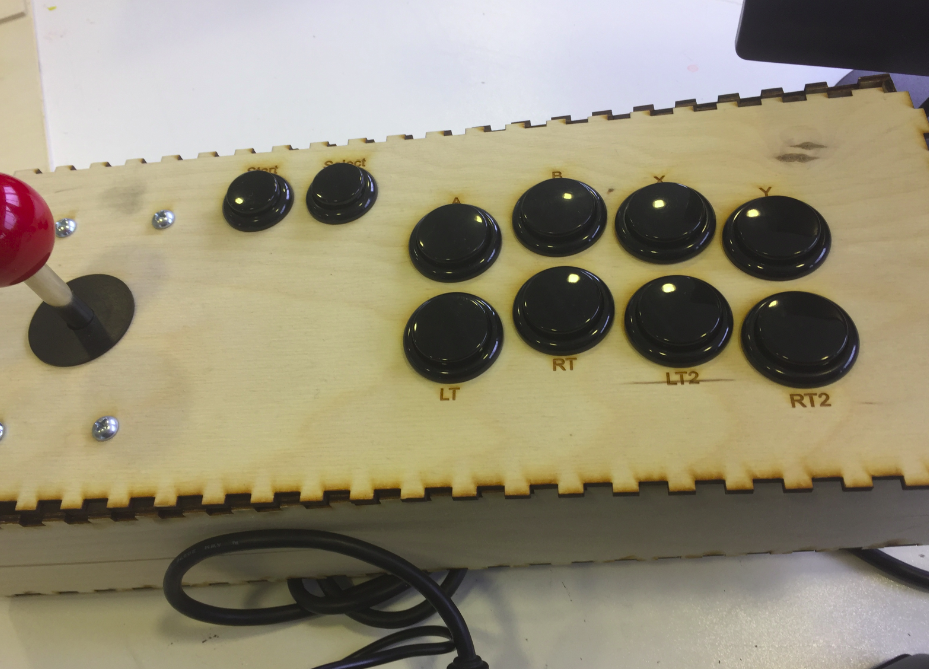
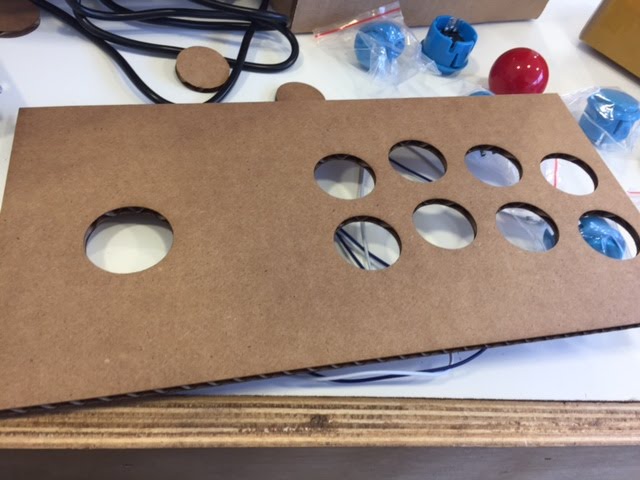
My final design for the box is attached below. It has engraved letters for x, y, a, b, start, select, left trigger, right trigger, left trigger 2, and right trigger two. Also the holes for the controller were a few millimeters too short, so I had to take a drill bit and slowly sand away small amounts of the holes.
As I got the buttons in from Amazon,

I had to find the exact same type of buttons to mirror the ones that Mr. D had given me. I found buttons that ranged from 100 bucks to 20, and since the XCSOURCE buttons seemed to be the ones most like the original buttons I had, I decided to order them.
I finally finished the final design for the cabinet. I also presented it in class today and I need to start working on the shopbot to create the 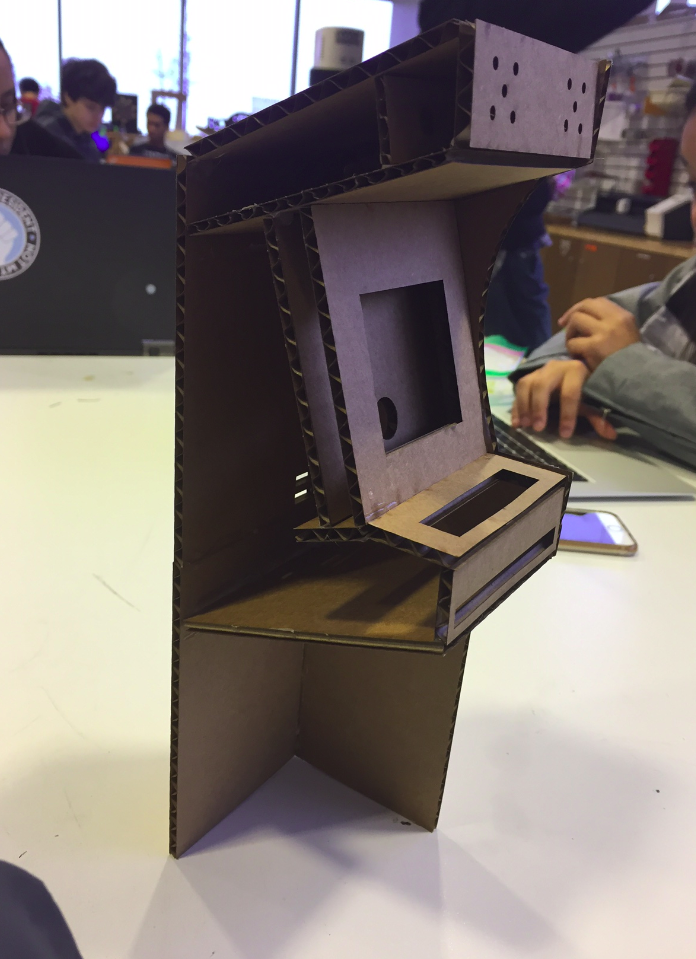 actual model of the MAME cabinet.
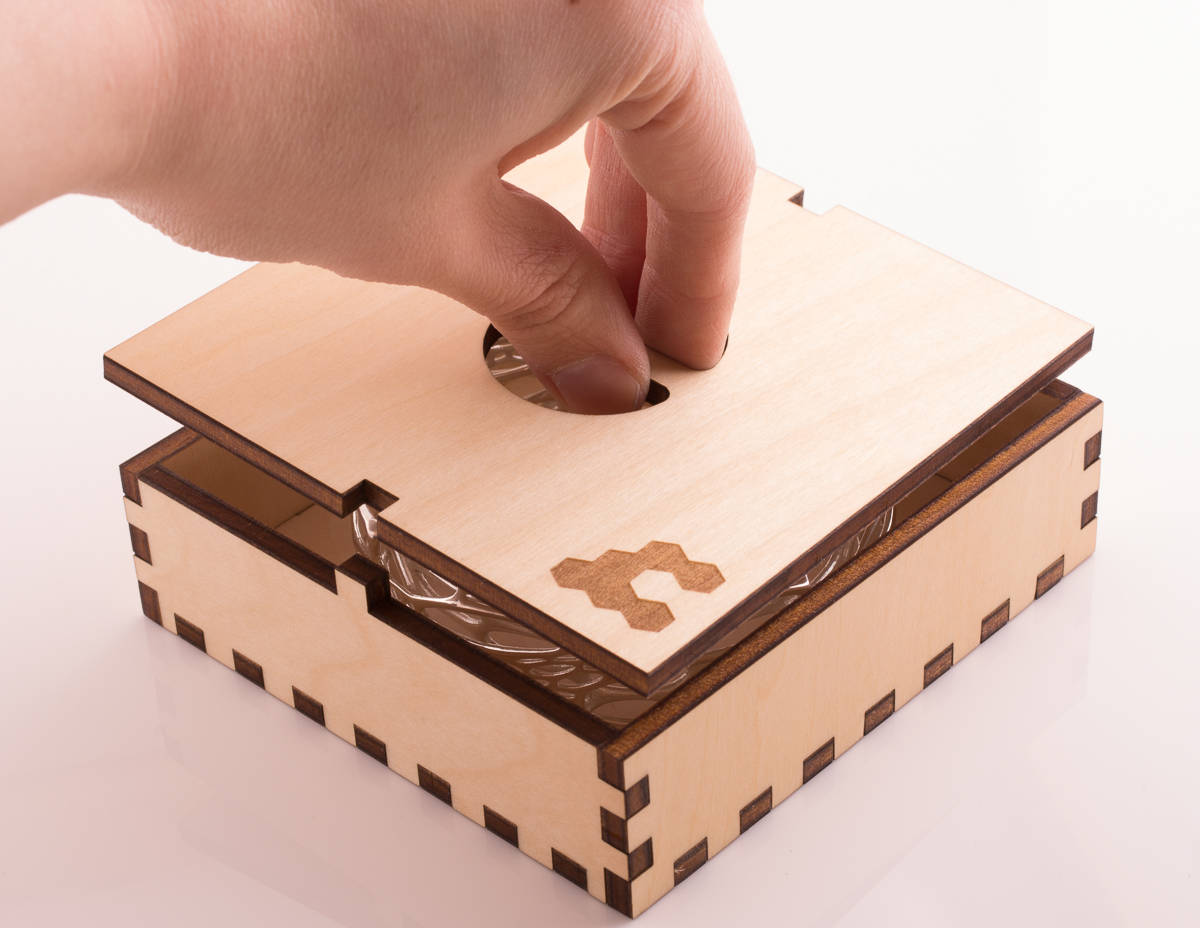
My final project was to finish the buttons for the arcade. I made a wood case with the button plans on it and finalized the plans for the way I wanted the buttons to be.
Unfortunately, I was not able to find a way to put stickers on the buttons so that we could know which was which. Also, there is a problem where there is no escape key for every button so I believe I will have to put a keyboard on there to make sure that everyone can get out of the games they don’t want to play.
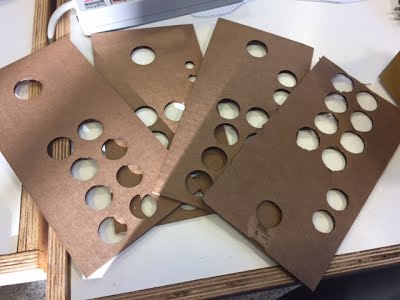
When I had to wire the buttons, we needed a base. Unfortunately, the plans were about a millimeter off for most, and so my final version (pictured below) had 29.5 mm diameter holes. This was a bit of a struggle and I wasted a lot of cardboard doing this but it finally worked.
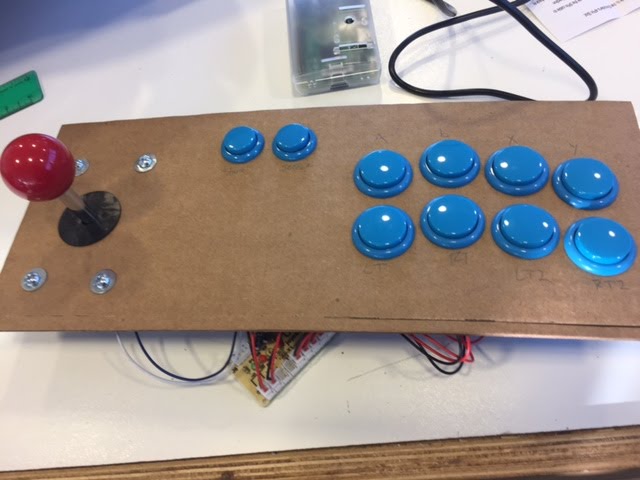
The buttons range from start, stop, and then a, b, x, y, right trigger 1 and 2, and finally left trigger 1 and 2. The wiring got a bit weird when I couldn’t figure out which color wire was the wire for grounded.
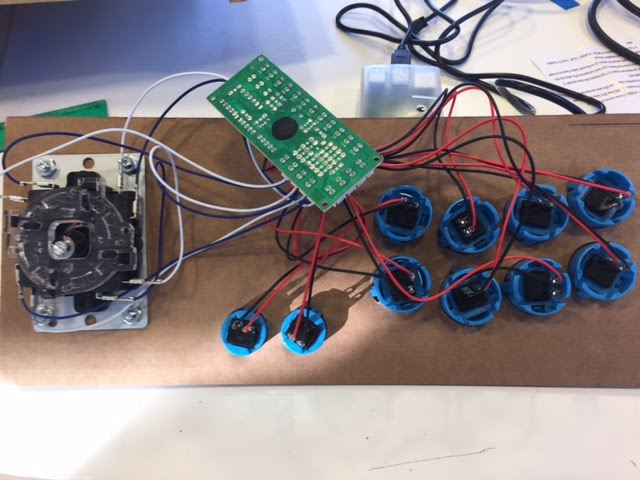
I got the buttons to work and connect to the Raspberry Pi as well. Now all I need is a case to contain the button and be able to plug the Raspberry Pi into.
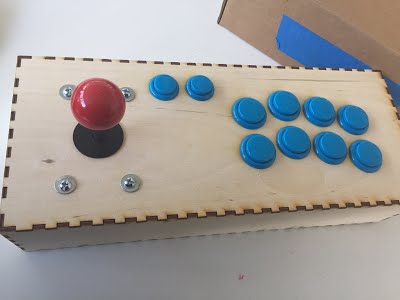
First I decided to make my control panel. I decided to get a plan off the internet I would later edit, for the two smaller buttons to do a different function. I was thinking they would be select and start. But first I had to get the sizes right. Unfortunately on my first go of making the plans, the plans were just about a millimeter off for each button.
As you can see in the picture, I have 8 buttons for a, b, x, y, left trigger, and right trigger, ect. I still have a few buttons left over that I will eventually decide to do something with. Once I get all the buttons attached and working, I have to figure out if this is the best position for something I want to do and I will determine this after I get the buttons working.
I have decided to make a MAME cabinet for my final project. This has lead to many successes, struggles, and lots of learning opportunities. My struggles have included getting ROMs to work and controllers to work and to set up the Raspberry Pi with an updated Retropie. The ROMs have shown me how to look in depth more and have taught me to look at directions more than I used to. The controller struggle has taught me to persevere through times where nothing seems like it wants to work with you and the updated Retropie has taught me that even if you solve something once you might need to solve it again to make it truly work.
I have discovered a lot through making the Retropie work and many of these skills will help me build the actual cabinet for the MAME system. Some of my moments of breakthrough include the time where I was working on the ROMs and they were not working and I decided to go look back at the instructions. I figured out that I was missing some files from the download and then the games started to work.
For my next steps I have to start prototyping the actual MAME cabinet, and I need to start thinking about the control panel. I need to get into the ways to design the MAME cabinet so that it is comfortable to play on and have fun on. I don’t know what this will include but I have a basic plan that I want to see come to fruition. I feel like I’m behind everyone else but I also feel like my project is harder than most. I feel that since I have to work with wood and circuits and software that I have chosen a hard project that I need to work hard on. I feel that I can finish it in time and that I could really create something that is awesome.
- ROMs are annoying
- A whole side of the tech community that I haven’t seen before
- Tons of fun new projects by others
- Raspberry Pi’s are awesome
- Learning about circuits and wiring
- Learning about making something comfortable
- Learning about other people’s interests (like the tech office guys)
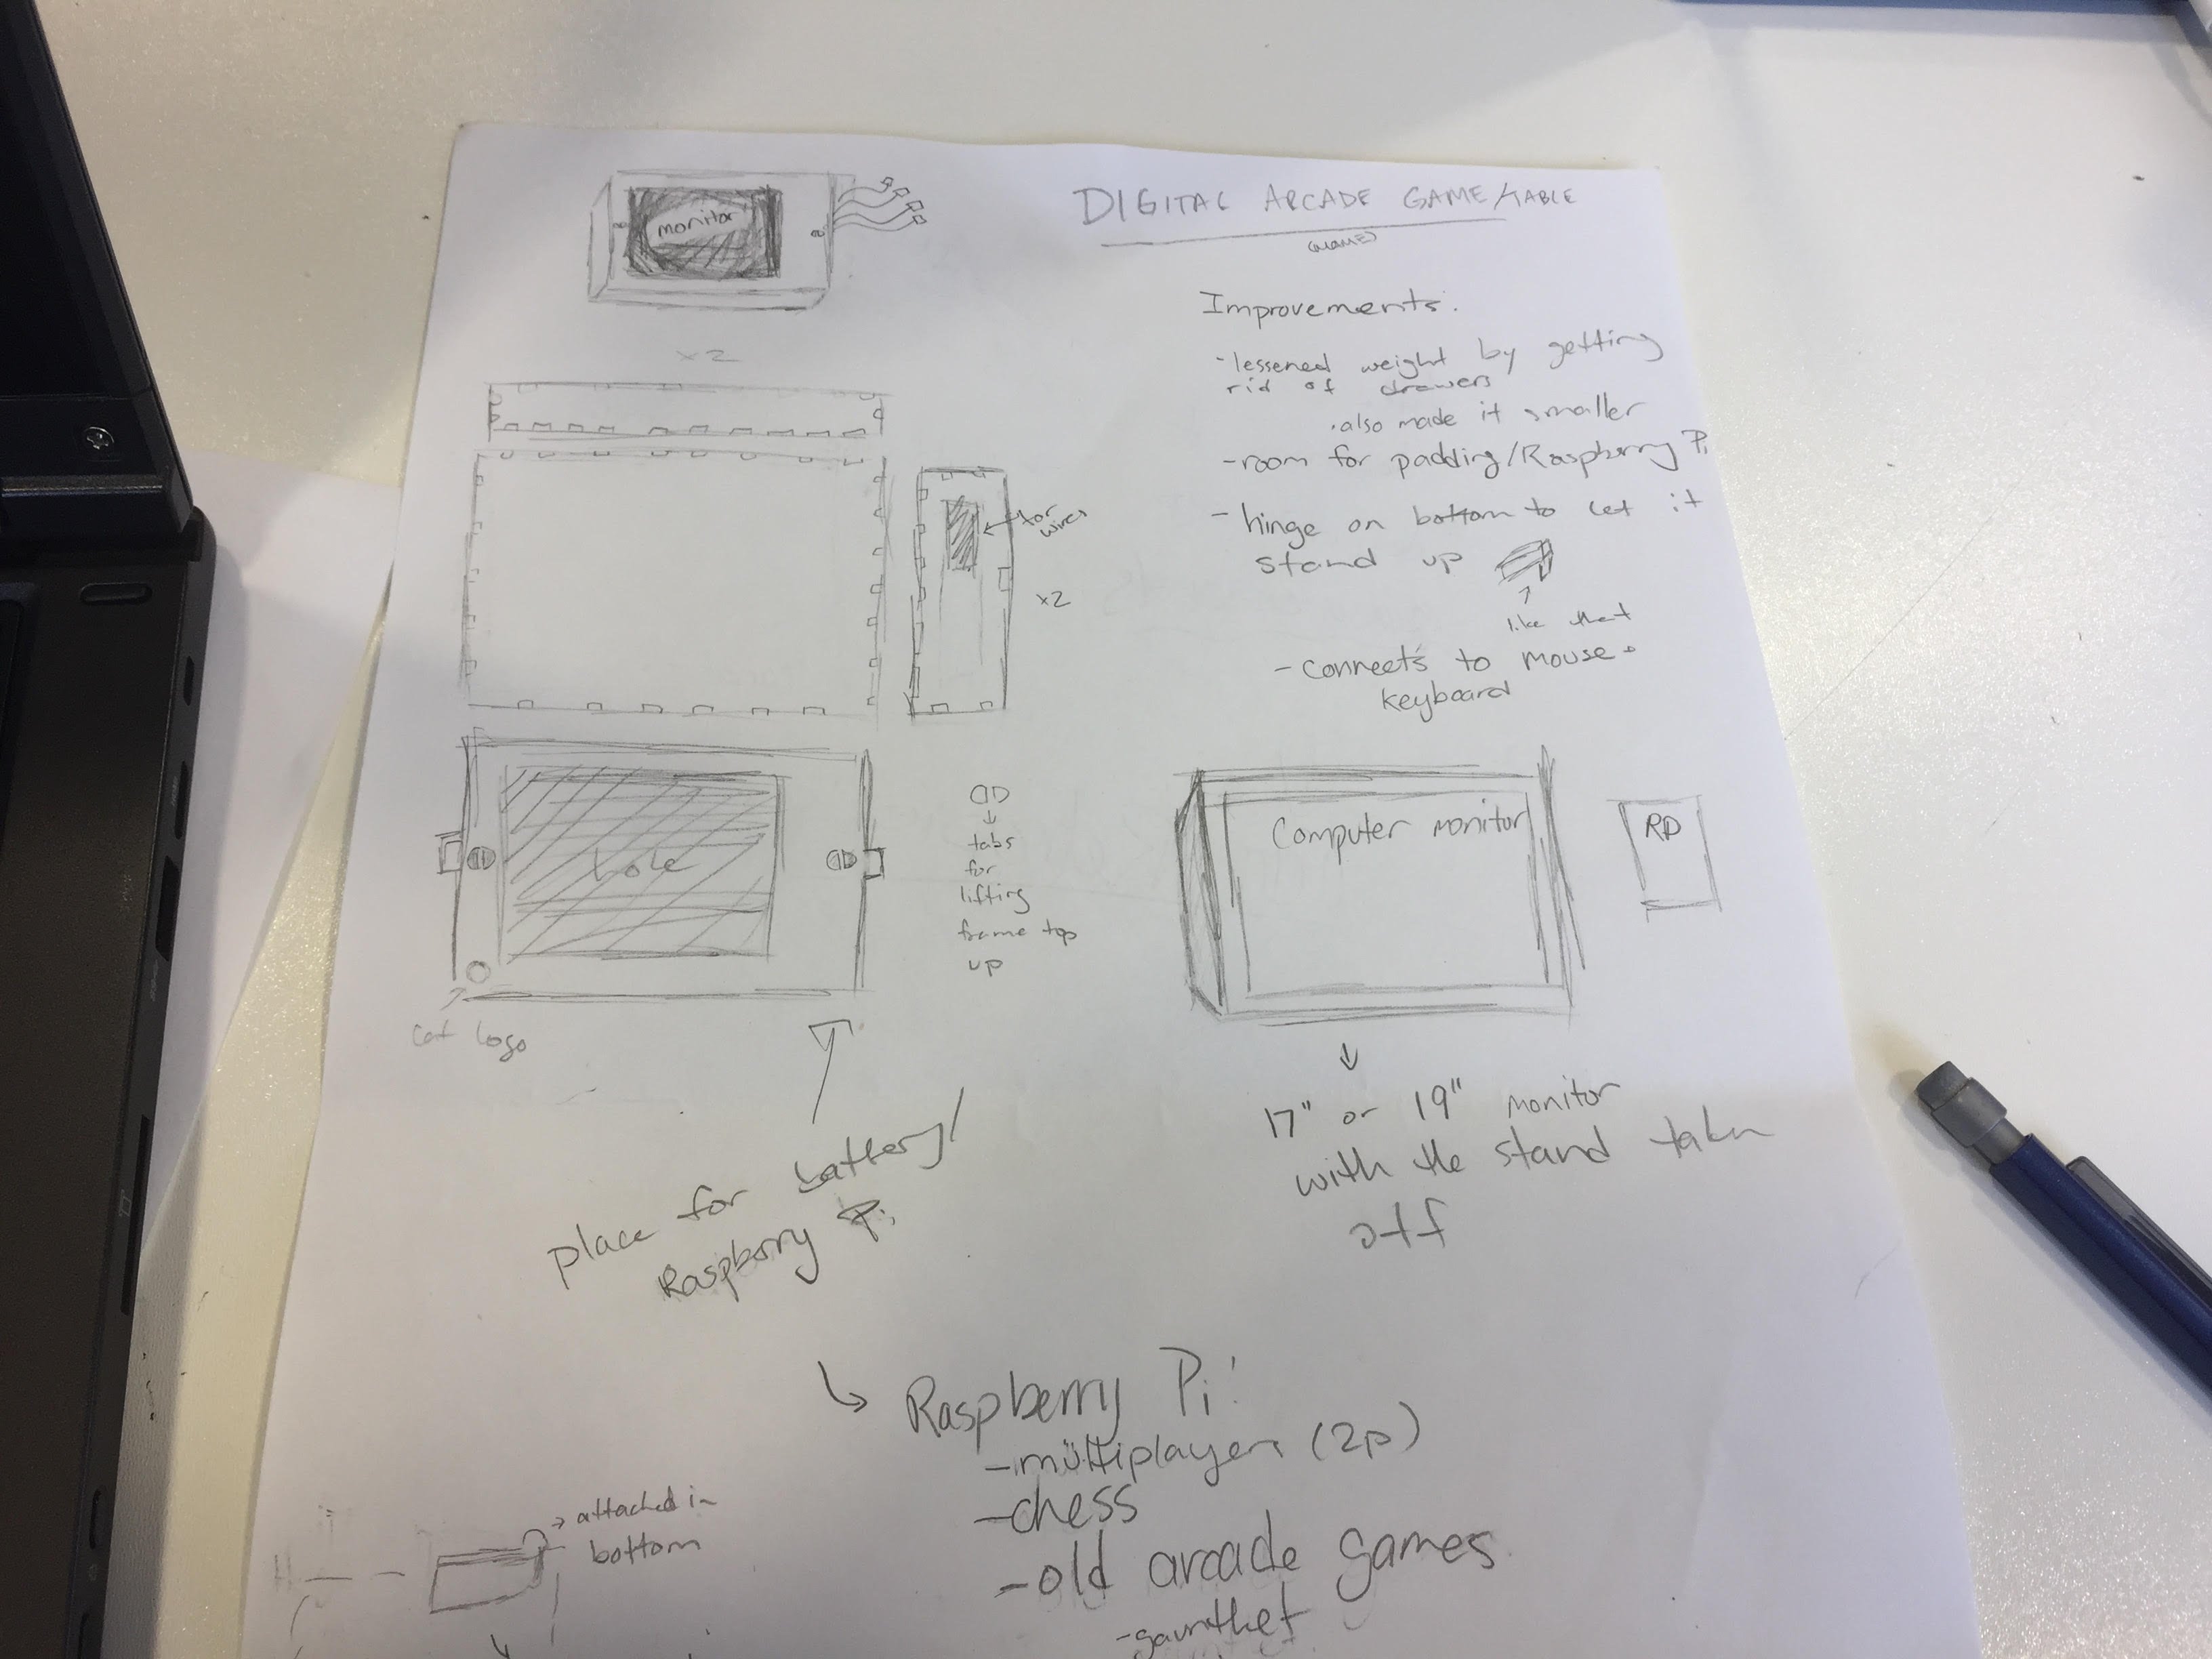
Mr. D told me he has ordered the buttons for the control panel, and so I started planning what the MAME cabinet would look like. I realized that a portable MAME cabinet, while portable and useful in that sense, would not create the same sort of feeling as an old-style MAME cabinet so I have decided to do a larger version than my partner, Adam Dulay, who is fixated on the portable side of the MAME cabinet. While this is going on, I have laid out a sort of plan for my MAME cabinet and a few measurements that I’m not sure are completely accurate but I think will work.
I also decided on a monitor size. I have decided on either a 19” 1440 x 900 or a 17” 1280 x 1024. I drew out the measurements in person to make sure it was the size I wanted.
As many of us know, it is easier to create something than fix the problems that come along with creating. The ROMs are no different. I have to go through many forums to find out what exactly is wrong with the ROMs. For instance, Basilisk II does not want to run, therefore I explored forums such as https://retropie.org.uk/forum/topic/1049/macintosh-basilisk-ii-8-bit-color/3. I believe I have fixed two different programs, Dreamcast and Cave Story and I will be testing that out next class. I have found that the audio for games works as well, though it is of lower quality than I expected. I will also be working on that next class.
Since I was not able to test the games without a keyboard or controller of sorts, I was not able to test out the emulators last class. Fortunately, I was able to borrow a usb keyboard. I tested out all the games that the emulators had. I was able to get many games to work but there were some games that seemed to not work. For instance:
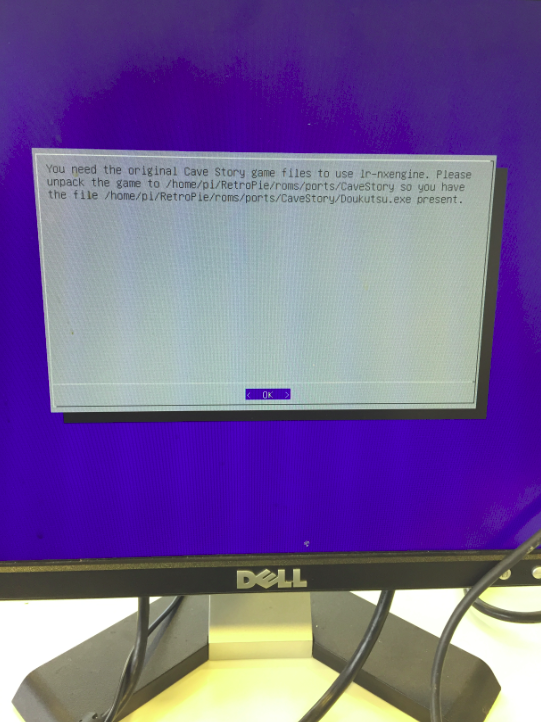
Cave Story, AMIGA (the emulator), Dreamcast, Macintosh, MSDOS and some of the Nintendo entertainment system games seemed to not have worked. I will be working on that more tomorrow.
While all the drivers seem to be working, the problem lies within the SNES style controller that we currently have. Some reviews on the SNES style controller says that they will break after two weeks of use or so. Unfortunately this also means that I do not have anything to use for my controller at this moment. I researched other controllers to use. Many of the ones that are used for RetroPie have reviews that have said that they break within a short while of usage. The best controllers that I have heard of so far are the PS3 and Xbox 360 controllers. I believe that an wired Xbox controller would work best considering the reviews of RetroPie and both controllers. I have found many websites showing how to set up the Xbox 360 controller as well.
Links:
http://www.handmadepixels.co.uk/blog/raspberrypi/using-an-xbox-360-controller-on-retropie/
https://github.com/RetroPie/RetroPie-Setup/wiki/Setting-up-the-XBox360-controller#3—init-script
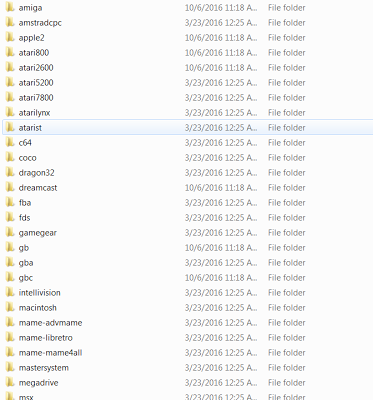
I have successfully downloaded most of the ROMs onto the flashdrive and transferred them to the Raspberry Pi. Some of the ROMs I needed were blocked by the web filter for “guns/violence” so I have to download the zip files at home and then move it to the folder and replace everything. The SCUMMVM also is not working for the slight confusion on my end to see exactly how to download it off of their website. These are just some of the roms I have had to download and transfer:
I finally got the Raspberry Pi to have enough space to update the RetroPie. Sadly that comes along with moving a lot of new roms that the RetroPie does not have.
Essentially, there are more roms than I initially planned but the system wants them to run games so I will download them all and move them over to the RetroPie with a USB. I also tested the system in general to see that it would work and it did. Thankfully, there were no problems after updating the RetroPie. Now I have to work on adding all these roms:
Links to ROMs:
https://github.com/retropie/retropie-setup/wiki/Atari-800-and-5200
https://github.com/retropie/retropie-setup/wiki/Amiga
https://github.com/RetroPie/uae4all2
https://github.com/retropie/retropie-setup/wiki/Atari-2600
https://github.com/retropie/retropie-setup/wiki/Apple-II
https://github.com/retropie/retropie-setup/wiki/Dreamcast
https://github.com/retropie/retropie-setup/wiki/Game-Boy
https://github.com/retropie/retropie-setup/wiki/Game-Boy-Color
https://github.com/retropie/retropie-setup/wiki/Macintosh
https://github.com/retropie/retropie-setup/wiki/Nintendo-64
https://github.com/retropie/retropie-setup/wiki/Nintendo-Entertainment-System
https://github.com/retropie/retropie-setup/wiki/ScummVM
https://github.com/retropie/retropie-setup/wiki/Super-Nintendo-Entertainment-System
https://github.com/retropie/retropie-setup/wiki/Doom
https://github.com/retropie/retropie-setup/wiki/Duke-Nukem-3D
https://github.com/retropie/retropie-setup/wiki/Quake
https://github.com/retropie/retropie-setup/wiki/Super-Mario-War
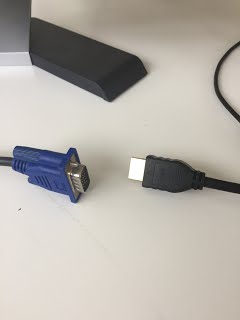
Unfortunately, today I ran into a problem with connecting the monitor to the Raspberry Pi. The HDMI cable for the Raspberry Pi does not have an adapter for the VGA cable on the monitor at Hawken at this moment.
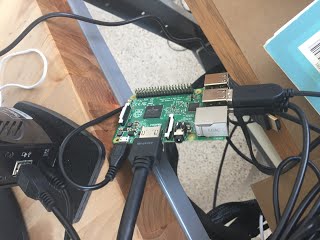
Thankfully, Mr. D let me use his HDMI cable, mouse, and keyboard to connect to the Raspberry Pi. I played around a bit with the Raspberry Pi and Mr. D let me know that the RetroPie was a bit out of date. I then decided to research how to update RetroPie.

I found out that the RetroPie does not have any space left on it. I am currently finding a way to fix that by researching on the internet. I am having fun but I’m still being challenged by the RetroPie not updating smoothly.
Links:
https://github.com/retropie/retropie-setup/wiki/updating-retropie
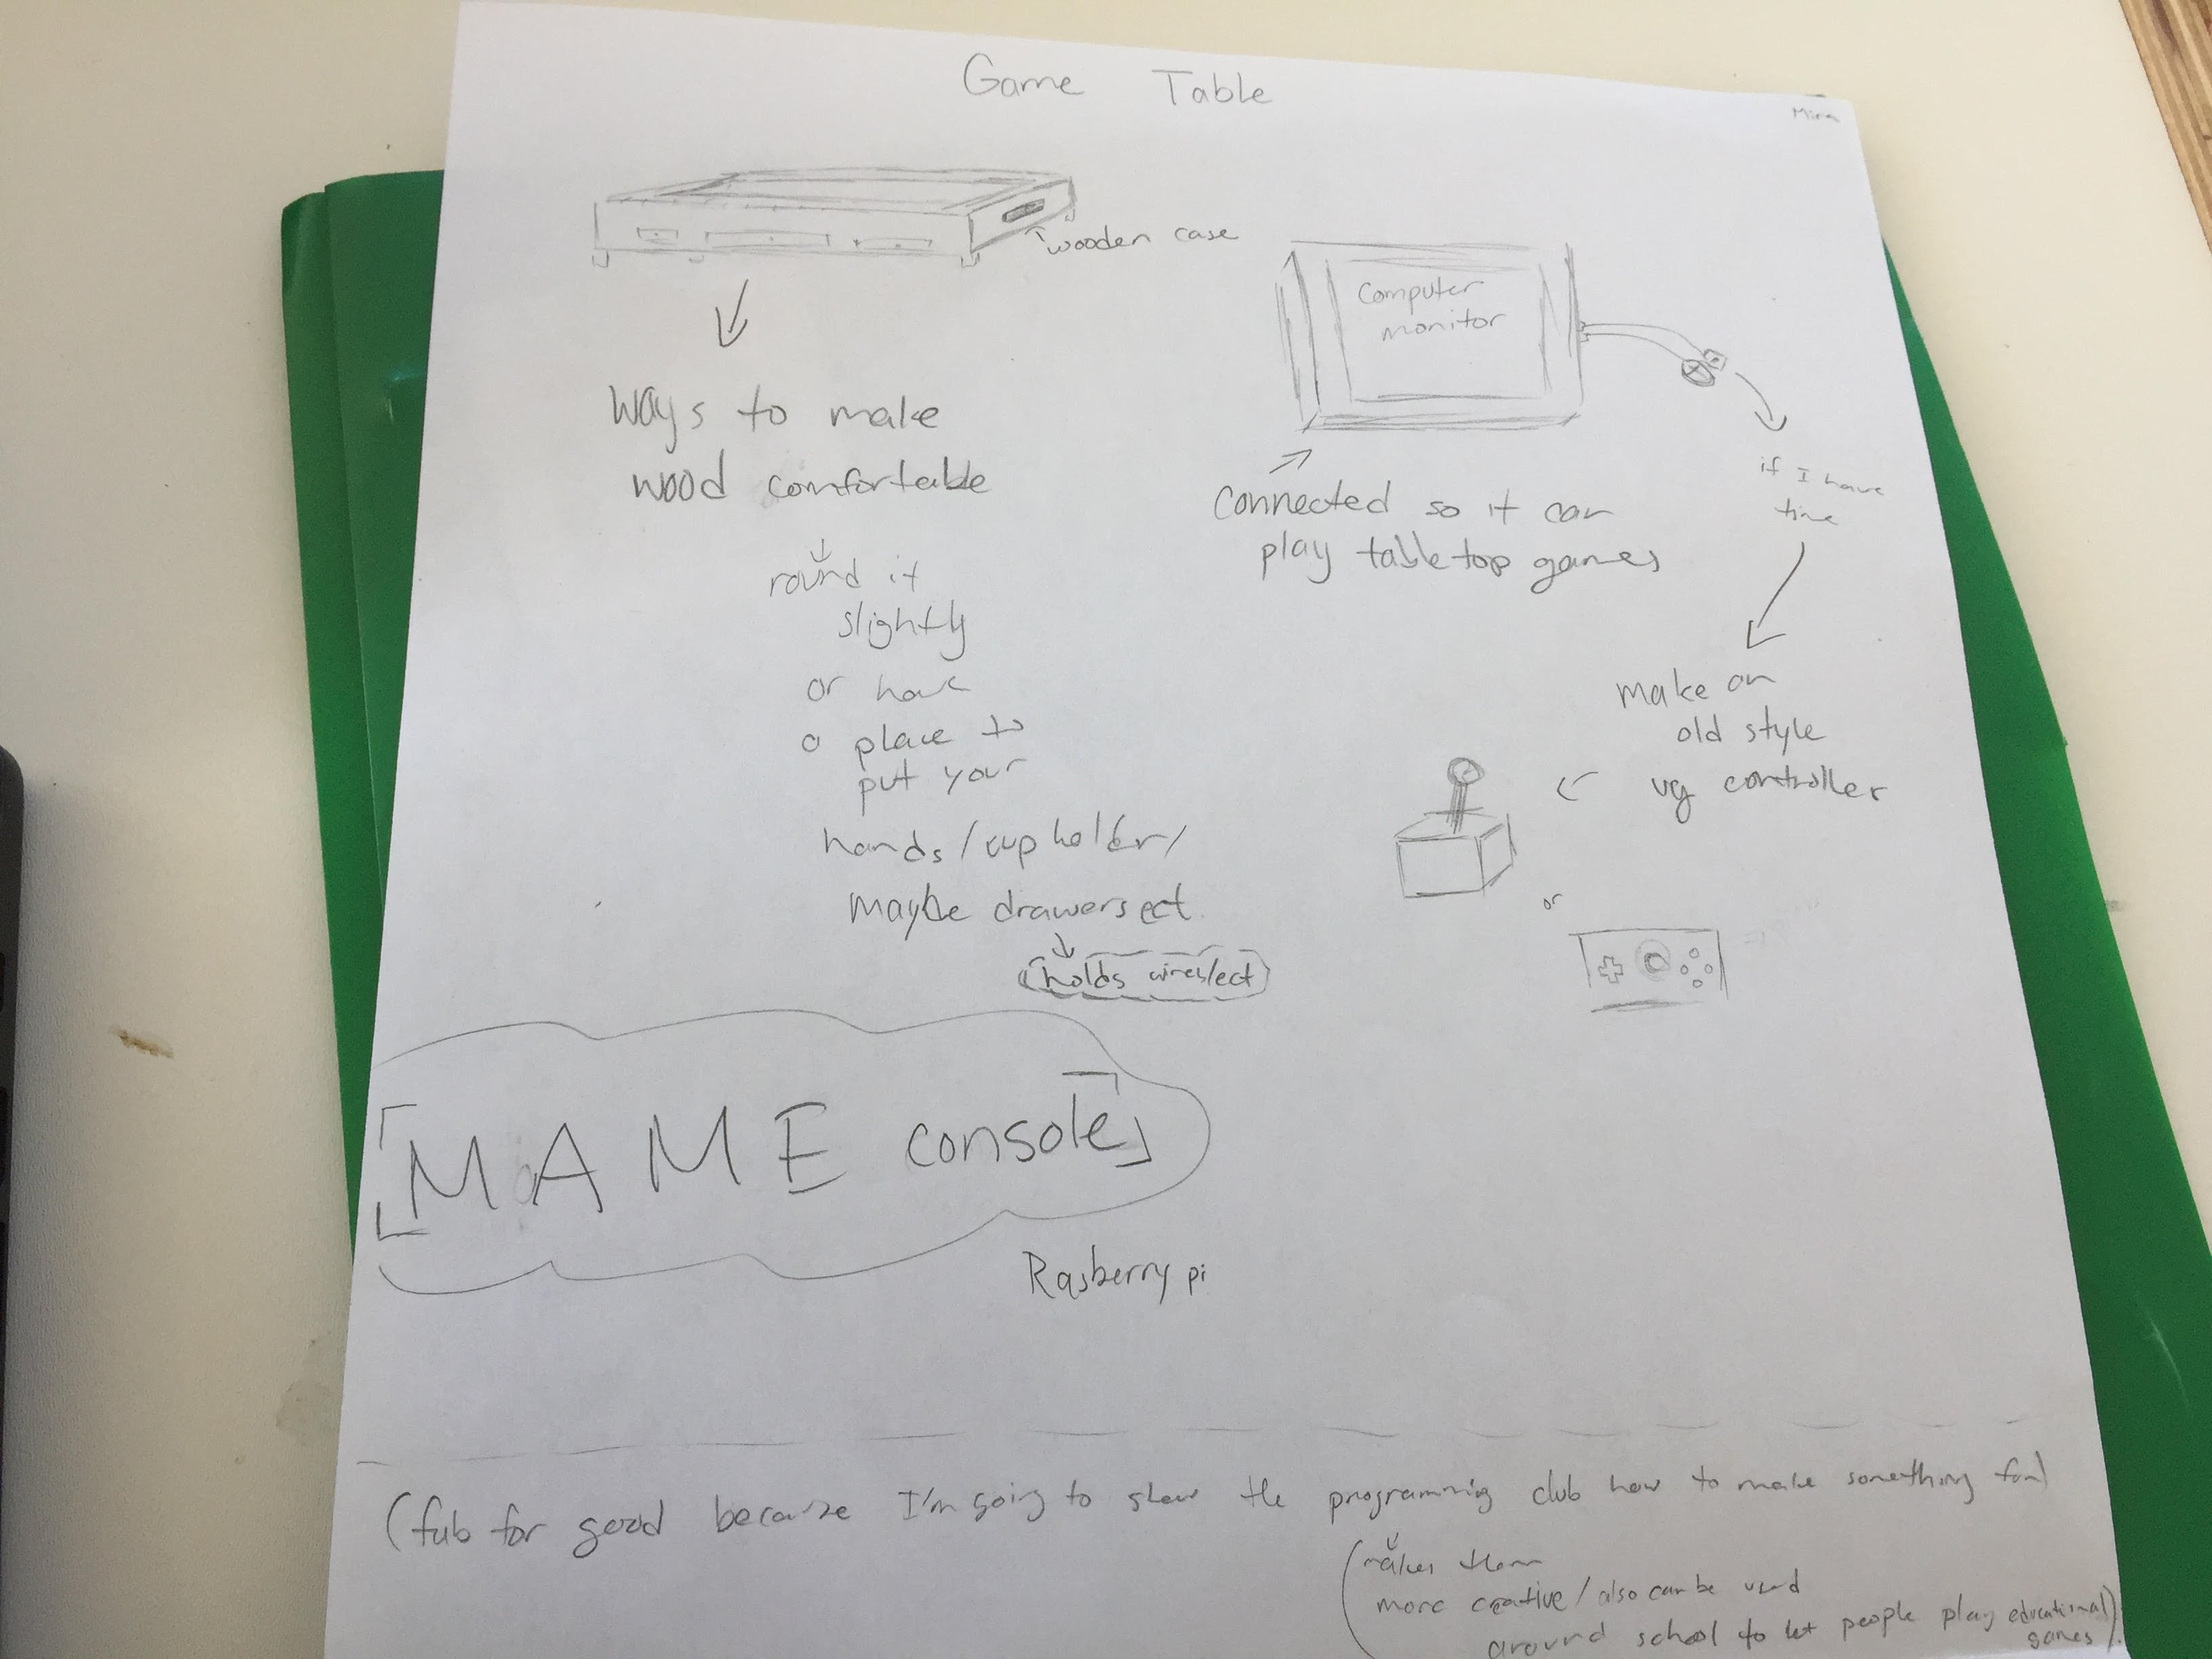
In class today we made a new model for our projects and our classmates went around adding ideas to our projects.
The advice I got on this were “Awesome project”, “Could it also be used for physical games like foosball” (which I will have to disappoint and say no to that because computer monitors are expensive and slightly fragile in the state I need it), and “What kind of controller are you using”. The one I focused most on was the controller comment. I could use a mouse and a keyboard or I could use an old controller from Amazon as other people who have built MAME consoles have. I am not sure which one I want to do; however I will need to make that decision sometime. Further than that, I researched more things about the Raspberry Pi and found the program called RetroPie built especially for this. I have found more websites on it, which I will link below.
Links:
https://supernintendopi.wordpress.com/
https://www.youtube.com/watch?v=mKSil5kJmwM
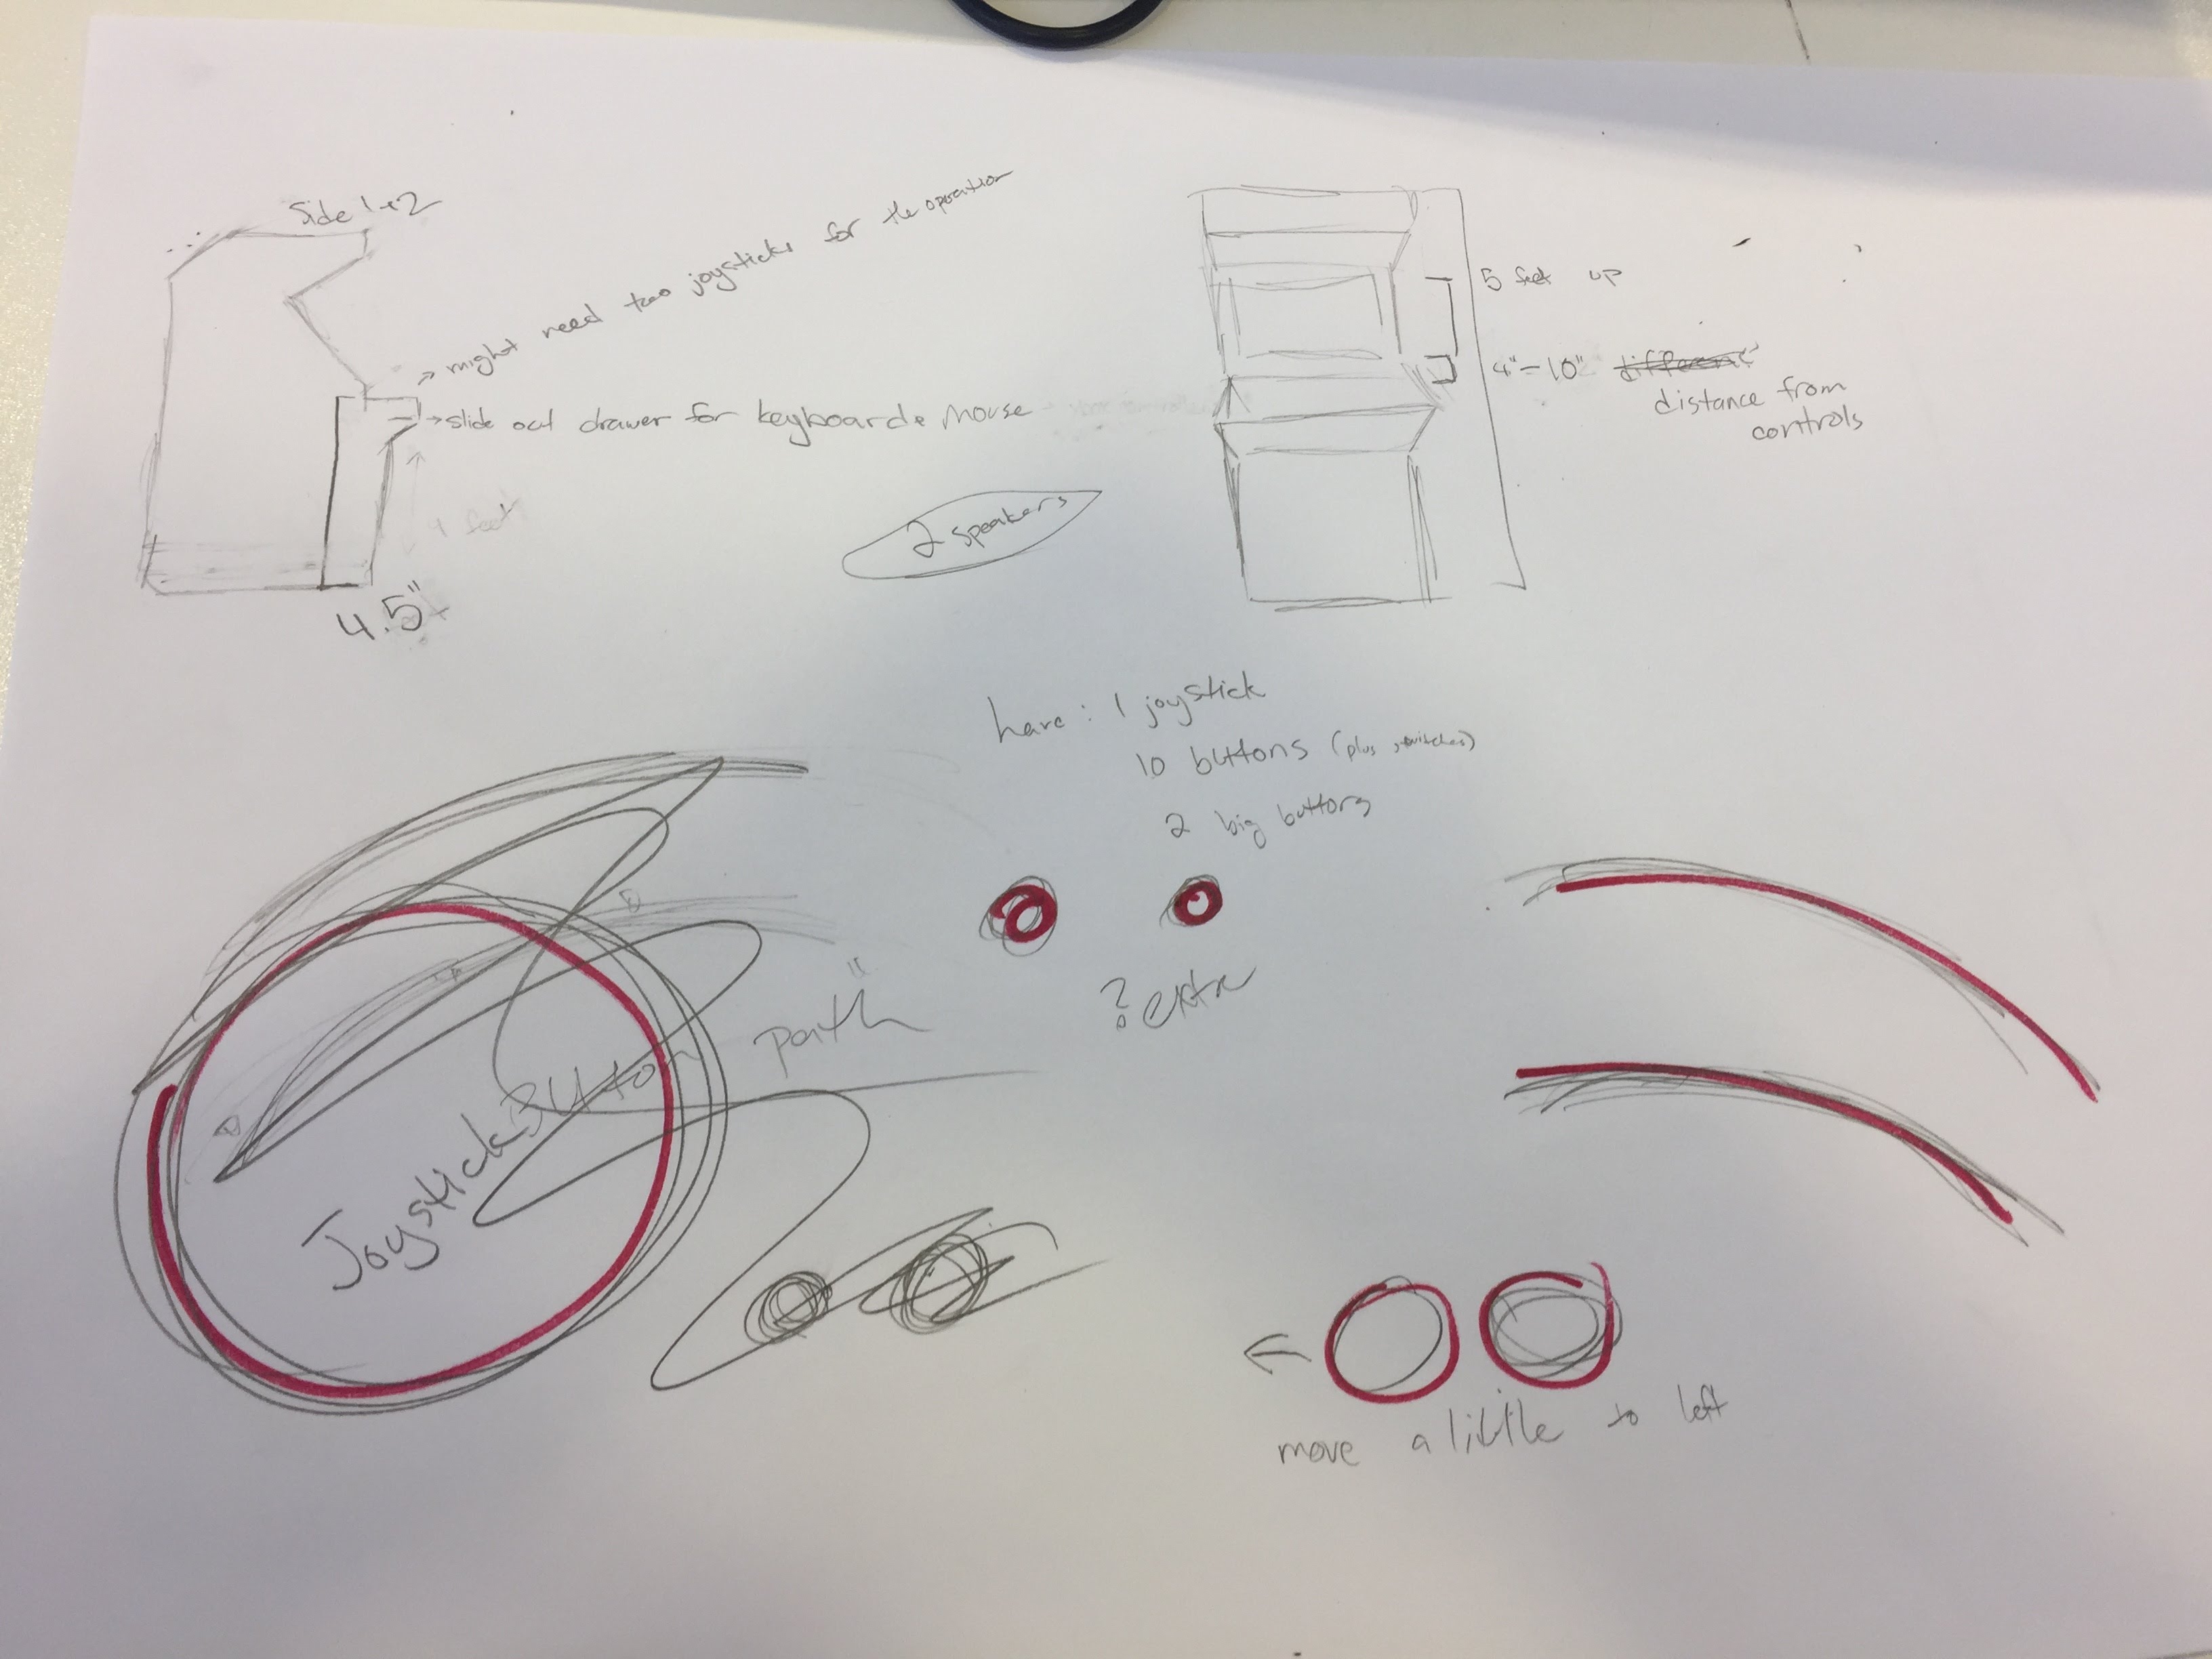
After initializing the idea of a MAME console, I decided to focus a bit of the making of the actual project. I went over the design and realized a few problems which I wrote down on paper.
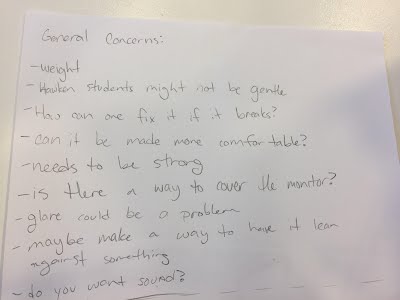
While concerns are always an issue in creating something, there are solutions that work equally as well. Though I’m obviously not through with designing and next class I will be working more on the Raspberry Pi for the console, I got some solutions to my problem down.
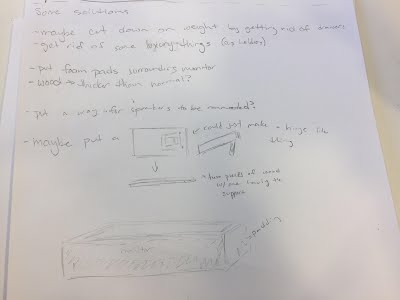
Along with this, I got some links to some websites that will help me in the future. Most containing new ideas that I used in my ideas now.
http://www.woodcraft.com/articles/613/making-wooden-hinges.aspx
http://n-e-r-v-o-u-s.com/blog/wp-content/uploads/2014/04/woodBox-lid.jpg
I decided to research MAME consoles and Raspberry Pi, which are two very interconnected topics for my project. Some of the things that surprised me were the cheapness of the Raspberry Pi, which ranged from $10 to $100. I believe that the case and some of the basic things in my MAME console can be made in the FabLab. Unfortunately the Raspberry Pi and computer monitor will both be likely bought. Cords and anything connected to the MAME console may have to be bought depending on what is needed. There are many websites that show Raspberry Pi being used along with MAME consoles being made. I have added the links below to MAME consoles. These links range from completely complicated to a DIY Ikea table MAME console.
Links to MAME consoles:
http://www.instructables.com/id/Mame-Ikea-Cabinet/
-Made from Ikea Cabinet
-Has many links to other MAME console ideas
-Has step by step instructions (not in English however)
http://www.instructables.com/id/MAME-gaming-table-with-Raspberry-Pi/
-Expensive way to build a MAME gaming table, almost $300
-Step by step instructions in English
http://www.instructables.com/id/Ubuntu-Mame-Arcade-With-30000-Games/
-Complicated with 3000 games
-Very fancy build with step by step instructions in English
http://www.instructables.com/id/My-MAME-Cabinet/
-Rustic look
-Instructions, not step by step, but an overall process
https://makezine.com/2013/01/22/portable-raspberry-pi-mame-device/
-Portable MAME console
-Able to go into any sort of port which is very special
-Cheap, only $70 for a portable gaming console
I got some feedback from people, most commented with “cool” or “sweet” but some people brought up the fact that some other people didn’t have laptops they could connect to the monitor screen and I got some advice on looking at Raspberry Pi. I also got a similar idea from a classmate where they talked about Apple app sharing program where they could put in games into iMessage to share with others. While this does not exactly help my project it does bring up a way that this could be improved. You could try to input games into the console so you could randomly play them. There are also ways to make a MAME console more comfortable, because wood is annoying to rest your hands on you could round corners or have other functions.
10 Replies to “MAME Cabinet”
Comments are closed.